cocos2d as an Application Framework – Part 1
 [Concrete/Interesting] cocos2d is a multi-platform games engine written in C/C++. It has been ported to a number of environments including the iPhone under Objective-C.
Like all developers, I dream of creating the most popular game ever. I’m probably a little too late because Pac Man day’s have come and gone. However, I believe the foundation of a games engine has application outside of the realm of games.
In this first part I will be discussing the use of the cocos2d games engine as an application framework. In later articles I will expand on this to show how we can mix elements of cocos2d and the iPhone UI Framework.
Basic Elements of a Games Engine
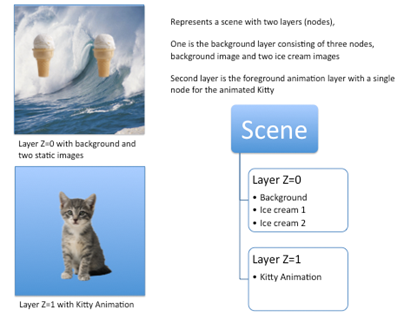
Take a look at Adobe Air and even Microsoft Silverlight. Under these frameworks applications are better thought of as scenes, with layers and objects (nodes on the scene). These objects may be animation or sprites (for instance a ‘Busy’ animation) or they may be user interface elements like labels, button or menus. Layers are groups of nodes that exist on the same Z-index or plane. This could be backgrounds, foregrounds, even popup dialogs or input boxes. And scenes are the world or landscape upon which everything is displayed, like the application window:
 cocos2d, like Adobe Air, has a time dimension. That is to say, object can be tested, modified, added or deleted to the scene over a timeline. Certain time functions are static in nature, such as a sprite animation or a transition from scene to scene. Some are less obvious such as the scaling and translations associated with a Carousel Menu.
Finally, cocos2d and other similar platforms allow you to tie up device events to objects. For example, using the accelerometer on the iPhone to control the direction and speed of a sprite, or making a button respond to touch input.
For a deeper introduction to cocos2d look at the documentation on their website: http://www.cocos2d-iphone.org/wiki/doku.php/
An Application Framework
So where am I going with all this. Well before I write the best game ever for the iPhone, I thought I’d release a cocos2d application. And I want to use cocos2d as an application framework, to take care of all my user interface management rather than a traditional games framework.
I also want to mix this with standard UI Framework elements. What I hope to get is a very innovative user interface with very little work.
What I will be covering in this article is:
- cocos2d application framework
- New Look Menus and Dialogs
- Integrating UI into the scene
- Responding to device events
Starting the Application
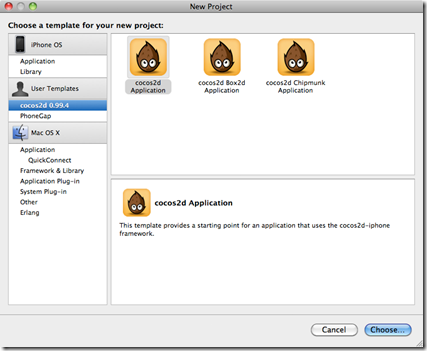
Cocos2D installs a number of templates into Xcode – this makes it easy to start your application. I’m using the standard ‘cocos2d Application’:
Running the wizard creates a simple ‘Hello World’ application which will server well as our staring point.
For the purposes of this article, I’m going to create a simple Kaleidoscope application based on a brilliant piece of code by Nori Nomura: http://github.com/norio-nomura
His implementation uses UIImagePickerController, Quartz and OpenGL, so this will test our ability to integrate UI framework into cocos2d and use cocos2d as an application framework.
Adding a Menu
Before I create a menu, let’s look at the structure of the application I’ve just created. There are two classes of interest. The application delegate and the HelloWorldScene.
In the application delegate, take a look at the applicationDidFinishLaunching: selector:
- (void) applicationDidFinishLaunching:(UIApplication*)application
{
	// CC_DIRECTOR_INIT()
	//
	// 1. Initializes an EAGLView with 0-bit depth format, and RGB565 render buffer
	// 2. EAGLView multiple touches: disabled
	// 3. creates a UIWindow, and assign it to the "window" var (it must already be declared)
	// 4. Parents EAGLView to the newly created window
	// 5. Creates Display Link Director
	// 5a. If it fails, it will use an NSTimer director
	// 6. It will try to run at 60 FPS
	// 7. Display FPS: NO
	// 8. Device orientation: Portrait
	// 9. Connects the director to the EAGLView
	//
	CC_DIRECTOR_INIT();

	// Obtain the shared director in order to...
	CCDirector *director = [CCDirector sharedDirector];

	// Turn on display FPS
	[director setDisplayFPS:YES];

	// Turn on multiple touches
	EAGLView *view = [director openGLView];
	[view setMultipleTouchEnabled:YES];

	// Default texture format for PNG/BMP/TIFF/JPEG/GIF images
	// It can be RGBA8888, RGBA4444, RGB5_A1, RGB565
	// You can change anytime.
	[CCTexture2D setDefaultAlphaPixelFormat: kTexture2DPixelFormat_RGBA8888];

	[[CCDirector sharedDirector] runWithScene: [HelloWorld scene]];
}
This is where the framework is initialized and starts the business of showing the first scene. In this case, the scene called ‘Hello World’.
The ‘Hello World’ scene is implemented in the HelloWorldScene class. The important function to look at is the init: selector:
// on "init" you need to initialize your instance
-(id) init
{
	// always call "super" init
	// Apple recommends to re-assign "self" with the "super" return value
	if( (self=[super init] )) {

		// create and initialize a Label
		CCLabel* label = [CCLabel labelWithString:@"Hello World" fontName:@"Marker Felt" fontSize:64];

		// ask director the the window size
		CGSize size = [[CCDirector sharedDirector] winSize];

		// position the label on the center of the screen
		label.position =  ccp( size.width /2 , size.height/2 );

		// add the label as a child to this Layer
		[self addChild: label];
	}
	return self;
}
Pretty simple stuff. All it’s doing is setting up and positioning a label and adding this to the scene. Of course, under the hood the framework is doing the clever stuff of rendering the scene and the layers and nodes.
cocos2d supports some primitive node types like layers and labels as well as buttons and menus. I’m going to modify the HelloWorldScene to manage a menu node with menu items. I do this by creating a menu in the init: selector:
-(id) init
{
	// always call "super" init
	// Apple recommends to re-assign "self" with the "super" return value
	if( (self=[super init] )) {
		CCMenuItemFont *mnuKaleidoscope = [CCMenuItemFont itemFromString: @"Kaleidoscope" target:self selector:@selector(onKaleidoscope:)];
		CCMenuItemFont *mnuAbout = [CCMenuItemFont itemFromString: @"About" target:self selector:@selector(onAbout:)];
		CCMenuItemFont *mnuQuit = [CCMenuItemFont itemFromString: @"Quit" target:self selector:@selector(onQuit:)];
		CCMenu *menu = [CCMenu menuWithItems:mnuKaleidoscope, mnuAbout, mnuQuit, nil];
		[menu alignItemsVertically];
		[self addChild:menu];

		CCLabel * l = [CCLabel labelWithString:@"Main Menu" fontName:@"marker felt" fontSize:24];
		l.position = ccp(160,400);
		[self addChild:l];

	}
	return self;
}
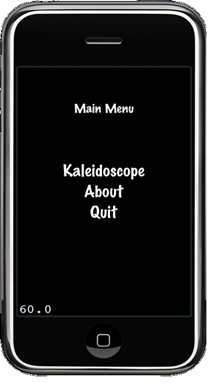
Ok, not a bad start. The result is a main screen menu with three menu items, displayed vertically. The menu items have some funky behaviour and there is a label ‘Main Menu’ at the top.
Few things to note, we have a scene with a single layer. On the layer we are adding a label and menu. The label is being positioned relative to the centre of the label. All nodes have origins (their centre) and by default this is in the centre of the bounding rectangle for the node. For the menu, we are adding three menu items, each with an appropriate selector. One final note at this point, when you run the application you will see a number at the bottom left of the screen. This shows the screens per second rendering of the engine. This is useful in debug but you will want to remove this for production. Setting setDisplayFPS:NO in applicationDidFinishLaunching will do this for you.
In Part 2…
I will look at extending the menu for a more funky look and feel as well as looking at dialogs and popup windows.

Comments
Post a Comment